Read and write Apache Iceberg tables using AWS Lake Formation hybrid access mode

Enterprises are adopting Apache Iceberg table format for its multitude of benefits. The change data capture (CDC), ACID compliance, and schema evolution features cater to representing big datasets that receive new records at a fast pace. In an earlier blog post, we discussed how to implement fine-grained access control in Amazon EMR Serverless using AWS Lake Formation for reads. Lake Formation helps you centrally manage and scale fine-grained data access permissions and share data with confidence within and outside your organization.
In this post, we demonstrate how to use Lake Formation for read access while continuing to use AWS Identity and Access Management (IAM) policy-based permissions for write workloads that update the schema and upsert (insert and update combined) data records into the Iceberg tables. The bimodal permissions are needed to support existing data pipelines that use only IAM and Amazon Simple Storage Service (Amazon) S3 bucket policy-based permissions and to support table operations that are not yet available in the analytics engines. The two-way permission is achieved by registering the Amazon S3 data location of the Iceberg table with Lake Formation in hybrid access mode. Lake Formation hybrid access mode allows you to onboard new users with Lake Formation permissions to access AWS Glue Data Catalog tables with minimal interruptions to existing IAM policy-based users. With this solution, organizations can use the Lake Formation permissions to scale the access of their existing Iceberg tables in Amazon S3 to new readers. You can extend the methodology to other open table formats, such as Linux Foundation Delta Lake tables and Apache Hudi tables.
Key use cases for Lake Formation hybrid access mode
Lake Formation hybrid access mode is useful in the following use cases:
- Avoiding data replication – Hybrid access mode helps onboard new users with Lake Formation permissions on existing Data Catalog tables. For example, you can enable a subset of data access (coarse vs. fine-grained access) for various user personas, such as data scientists and data analysts, without making multiple copies of the data. This also helps maintain a single source of truth for production and business insights.
- Minimal interruption to existing IAM policy-based user access – With hybrid access mode, you can add new Lake Formation managed users with minimal disruptions to your existing IAM and Data Catalog policy-based user access. Both access methods can coexist for the same catalog table, but each user can have only one mode of permissions.
- Transactional table writes – Certain write operations like insert, update, and delete are not supported by Amazon EMR for Lake Formation managed Iceberg tables. Refer to Considerations and limitations for additional details. Although you could use Lake Formation permissions for Iceberg table read operations, you could manage the write operations as the table owners with IAM policy-based access.
Solution overview
An example Enterprise Corp has a large number of Iceberg tables based on Amazon S3. They are currently managing the Iceberg tables manually with IAM policy, Data Catalog resource policy, and S3 bucket policy-based access in their organization. They want to share their transactional data of Iceberg tables across different teams, such as data analysts and data scientists, asking for read access across a few lines of business. While maintaining the ownership of the table’s updates to their single team, they want to provide restricted read access to certain columns of their tables. This is achieved by using the hybrid access mode feature of Lake Formation.
In this post, we illustrate the scenario with a data engineer team and a new data analyst team. The data engineering team owns the extract, transform, and load (ETL) application that will process the raw data to create and maintain the Iceberg tables. The data analyst team will query the tables to gather business insights from those tables. The ETL application will use IAM role-based access to the Iceberg table, and the data analyst gets Lake Formation permissions to query the same tables.
The solution can be visually represented in the following diagram.

For ease of illustration, we use only one AWS account in this post. Enterprise use cases typically have multiple accounts or cross-account access requirements. The setup of the Iceberg tables, Lake Formation permissions, and IAM based permissions are similar for multiple and cross-account scenarios.
The high-level steps involved in the permissions setup are as follows:
- Make sure that
IAMAllowedPrincipalshasSuperaccess to the database and tables in Lake Formation.IAMAllowedPrincipalsis a virtual group that represents any IAM principal permissions.Superaccess to this virtual group is required to make sure that IAM policy-based permissions to any IAM principal continues to work. - Register the data location with Lake Formation in hybrid access mode.
- Grant DATA LOCATION permission to the IAM role that manages the table with IAM policy-based permissions. Without the DATA LOCATION permission, write workloads will fail. Test the access to the table by writing new records to the table as the IAM role.
- Add SELECT table permissions to the
Data-Analystrole in Lake Formation. - Opt-in the
Data-Analystto the Iceberg table, making the Lake Formation permissions effective for the analyst. - Test access to the table as the
Data-Analystby running SELECT queries in Athena. - Test the table write operations by adding new records to the table as
ETL-application-roleusing EMR Serverless. - Read the latest update, again, as
Data-Analyst.
Prerequisites
You should have the following prerequisites:
- An AWS account with a Lake Formation administrator configured. Refer to Data lake administrator permissions and Set up AWS Lake Formation. You can also refer to Simplify data access for your enterprise using Amazon SageMaker Lakehouse for the Lake Formation admin setup in your AWS account. For ease of demonstration, we have used an IAM admin role added as a Lake Formation administrator.
- An S3 bucket to host the sample Iceberg table data and metadata.
- An IAM role to register your Iceberg table Amazon S3 location with Lake Formation. Follow the policy and trust policy details for a user-defined role creation from Requirements for roles used to register locations.
- An IAM role named
ETL-application-role, which will be the runtime role to execute jobs in EMR Serverless. The minimum policy required is shown in the following code snippet. Replace the Amazon S3 data location of the Iceberg table, database name, and AWS Key Management Service (AWS KMS) key ID with your own. For additional details on the role setup, refer to Job runtime roles for Amazon EMR Serverless. This role can insert, update, and delete data in the table.Add the following trust policy to the role:
- An IAM role called
Data-Analyst, to represent the data analyst access. Use the following policy to create the role. Also attach the AWS managed policyarn:aws:iam::aws:policy/AmazonAthenaFullAccessto the role, to allow querying the Iceberg table using Amazon Athena. Refer to Data engineer permissions for additional details about this role.Add the following trust policy to the role:
Create the Iceberg table
Complete the following steps to create the Iceberg table:
- Sign in to the Lake Formation console as the admin role.
- In the navigation pane under Data Catalog, choose Databases.
- From the Create dropdown menu, create a database named
iceberg_db. You can leave the Amazon S3 location property empty for the database. - On the Athena console, run the following provided queries. The queries perform the following operations:
- Create a table called
customer_csv, pointing to thecustomerdataset in the public S3 bucket. - Create an Iceberg table called
customer_iceberg, pointing to your S3 bucket location that will host the Iceberg table data and metadata. - Insert data from the CSV table to the Iceberg table.
- Create a table called
Set up the Iceberg table as a hybrid access mode resource
Complete the following steps to set up the Iceberg table’s Amazon S3 data location as hybrid access mode in Lake Formation:
- Register your table location with Lake Formation:
- Sign in to the Lake Formation console as data lake administrator.
- In the navigation pane, choose Data lake Locations.
- For Amazon S3 path, provide the S3 prefix of your Iceberg table location that holds both the data and metadata of the table.
- For IAM role, provide the user-defined role that has permissions to your Iceberg table’s Amazon S3 location and that you created according to the prerequisites. For more details, refer to Registering an Amazon S3 location.
- For Permission mode, select Hybrid access mode.
- Choose Register location to register your Iceberg table Amazon S3 location with Lake Formation.

- Add data location permission to
ETL-application-role:- In the navigation pane, choose Data locations.
- For IAM users and roles, choose
ETL-application-role. - For Storage location, provide the S3 prefix of your Iceberg table.
- Choose Grant.
Data location permission is required for write operations to the Iceberg table location only if the Iceberg table’s S3 prefix is a child location of the database’s Amazon S3 location property.

- Grant Super access on the Iceberg database and table to
IAMAllowedPrincipals:- In the navigation pane, choose Data permissions.
- Choose IAM users and roles and choose
IAMAllowedPrincipals. - For LF-Tags or catalog resources, choose Named Data Catalog resources.
- Under Databases, select the name of your Iceberg table’s database.
- Under Database permissions, select Super.
- Choose Grant.


- Repeat the preceding steps and for Tables – optional, choose the Iceberg table.
- Under Table permissions, select Super.
- Choose Grant.

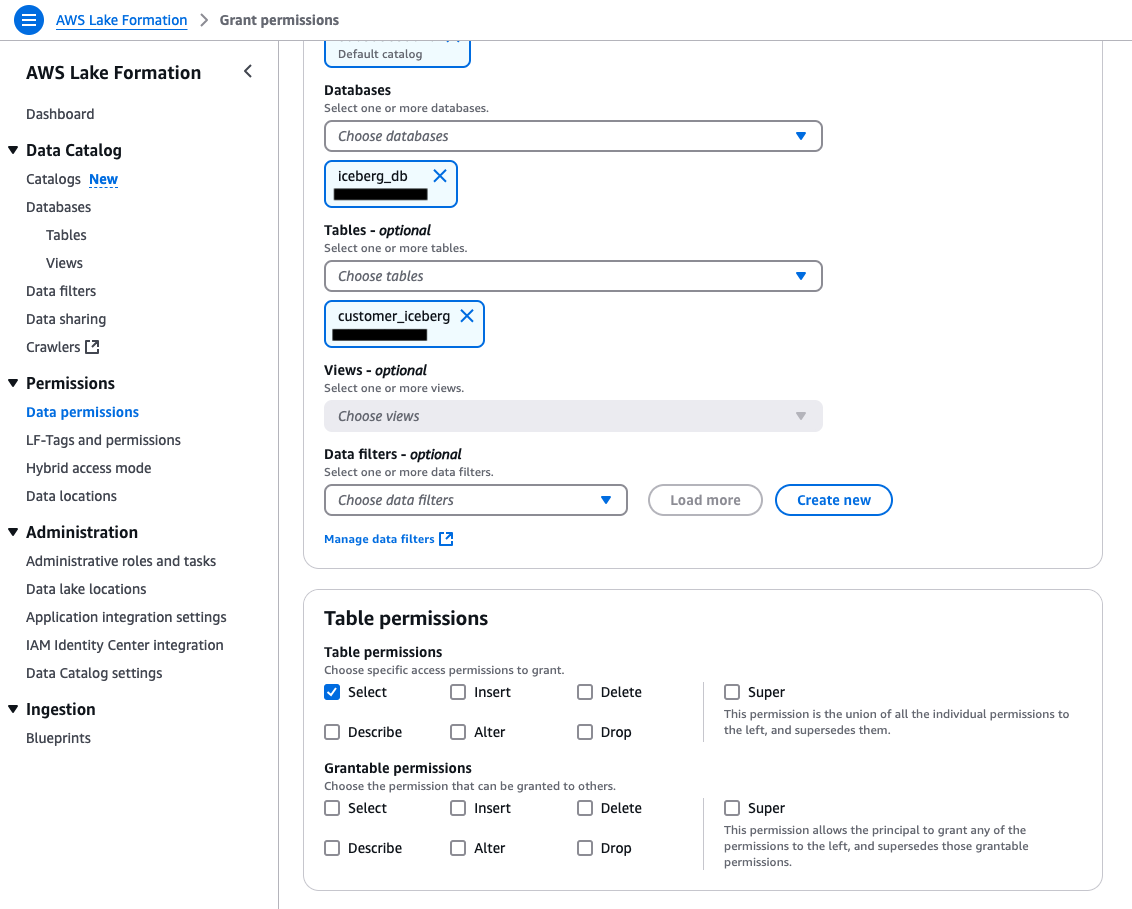
- Add database and table permissions to the
Data-Analystrole:- Repeat the steps in Step 3 to grant permissions for the
Data-Analystrole, once for database-level permission and once for table-level permission. - Select Describe permissions for the Iceberg database.
- Select Select permissions for the Iceberg table.
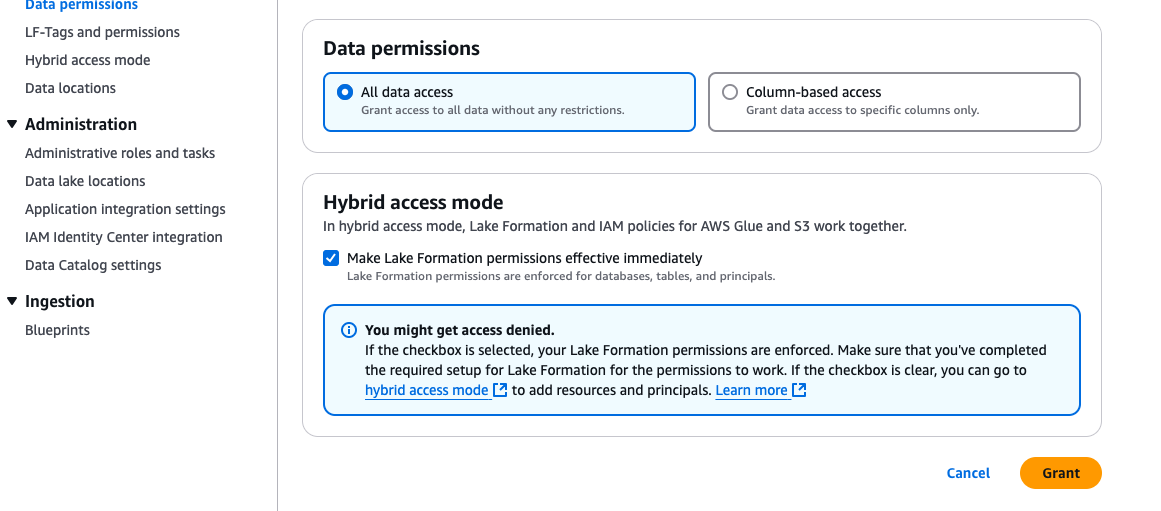
- Under Hybrid access mode, select Make Lake Formation permissions effective immediately.
- Choose Grant.
- Repeat the steps in Step 3 to grant permissions for the
The following screenshots show the database permissions for Data-Analyst.


The following screenshots show the table permissions for Data-Analyst.
- Verify Lake Formation permissions on the Iceberg table and database to both
Data-AnalystandIAMAllowedPrincipals:- In the navigation pane, choose Data permissions.
- Filter by
Table= customer_iceberg.
You should seeIAMAllowedPrincipalswith All permission and Data-Analyst with Select permission.
- Similarly, verify permissions for the database by filtering
database=iceberg_db.
You should see IAMAllowedPrincipals with All permission and Data-Analyst with Describe permission.

- Verify Lake Formation opt-in for
Data-Analyst:- In the navigation pane, choose Hybrid access mode.
You should see Data-Analyst opted-in for both database and table level permissions.

Query the table as the Data-Analyst role in Athena
While you are logged in to the AWS Management Console as admin, set up the Athena query results bucket:
- On the console navigation bar, choose your user name.
- Choose Switch role to switch to the
Data-Analystrole.
- Enter your account ID, IAM role name (
Data-Analyst), and choose Switch Role.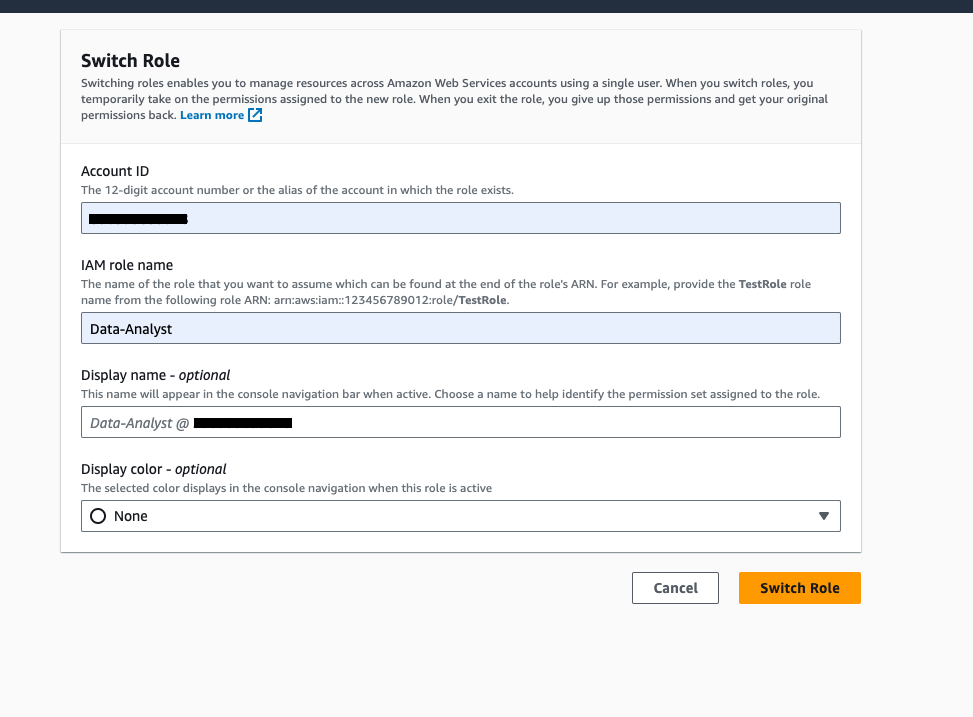
- Now that you’re logged in as the
Data-Analystrole, open the Athena console and set up the Athena query results bucket. - Run the following query to read the Iceberg table. This verifies the Select permission granted to the
Data-Analystrole in Lake Formation.

Upsert data as ETL-application-role using Amazon EMR
To upsert data to Lake Formation enabled Iceberg tables, we will use Amazon EMR Studio, which is an integrated development environment (IDE) that makes it straightforward for data scientists and data engineers to develop, visualize, and debug data engineering and data science applications written in R, Python, Scala, and PySpark. EMR Studio will be our web-based IDE to run our notebooks, and we will use EMR Serverless as the compute engine. EMR Serverless is a deployment option for Amazon EMR that provides a serverless runtime environment. For the steps to run an interactive notebook, see Submit a job run or interactive workload.
- Sign out of the AWS console as
Data-Analystand log back or switch the user to admin. - On the Amazon EMR console, choose EMR Serverless in the navigation pane.
- Choose Get started.
- For first-time users, Amazon EMR allows creation of an EMR Studio without a virtual private cloud (VPC). Create an EMR Serverless application as follows:
- Provide a name for the EMR Serverless application, such as
DemoHybridAccess. - Under Application setup, choose Use default settings for interactive workloads.
- Choose Create and start application.
- Provide a name for the EMR Serverless application, such as


The next step is to create an EMR Studio.
- On the Amazon EMR console, choose Studio under EMR Studio in the navigation pane.
- Choose Create Studio.
- Select Interactive workloads.
- You should see a default pre-populated section. Keep these default settings and choose Create Studio and launch Workspace.

- After the workspace is launched, attach the EMR Serverless application created earlier and select
ETL-application-roleas the runtime role under Compute.

- Download the notebook Iceberg-hybridaccess_final.ipynb and upload it to EMR Studio workspace.
This notebook configures the metastore properties to work with Iceberg tables. (For more details, see Using Apache Iceberg with EMR Serverless.) Then it performs insert, update, and delete operations in the Iceberg table. It also verifies if the operations are successful by reading the newly added data.
- Select PySpark as the kernel and execute each cell in the notebook by choosing the run icon.
Refer to Submit a job run or interactive workload for further details about how to run an interactive notebook.
The following screenshot shows that the Iceberg table insert operation completed successfully.

The following screenshot illustrates running the update statement on the Iceberg table in the notebook.

The following screenshot shows that the Iceberg table delete operation completed successfully.

Query the table again as Data-Analyst using Athena
Complete the following steps:
- Switch your role to
Data-Analyston the AWS console. - Run the following query on the Iceberg table and read the row that was updated by the EMR cluster:
The following screenshot shows the results. As we can see, ‘c_first_name’ column is updated with new value.

Clean up
To avoid incurring costs, clean up the resources you used for this post:
- Revoke the Lake Formation permissions and hybrid access mode opt-in granted to the
Data-Analystrole andIAMAllowedPrincipals. - Revoke the registration of the S3 bucket to Lake Formation.
- Delete the Athena query results from your S3 bucket.
- Delete the EMR Serverless resources.
- Delete
Data-Analystrole andETL-application-rolefrom IAM.
Conclusion
In this post, we demonstrated how to scale the adoption and use of Iceberg tables using Lake Formation permissions for read workloads, while maintaining full control over table schema and data updates through IAM policy-based permissions for the table owners. The methodology also applies to other open table formats and standard Data Catalog tables, but the Apache Spark configuration for each open table format will vary.
Hybrid access mode in Lake Formation is an option you could use to adopt Lake Formation permissions gradually and scale those use cases that support Lake Formation permissions while using IAM based permissions for the use cases that don’t. We encourage you to try out this setup in your environment. Please share your feedback and any additional topics you would like to see in the comments section.
About the Authors
 Aarthi Srinivasan is a Senior Big Data Architect with AWS Lake Formation. She collaborates with the service team to enhance product features, works with AWS customers and partners to architect lake house solutions, and establishes best practices.
 Parul Saxena is a Senior Big Data Specialist Solutions Architect in AWS. She helps customers and partners build highly optimized, scalable, and secure solutions. She specializes in Amazon EMR, Amazon Athena, and AWS Lake Formation, providing architectural guidance for complex big data workloads and assisting organizations in modernizing their architectures and migrating analytics workloads to AWS.
Post Comment